Here are a few simple steps to access the animation settings:
-
Go to a page
-
Click to Edit with Pixe Builder
-
Click to Container/Column Settings
-
Click to Advanced
-
Under Entrance Animation
-
Select the animation effect to your need
Entrance Animation Settings (Container/Column)
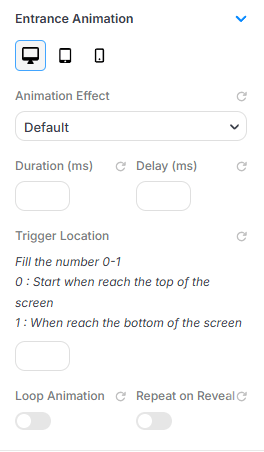
This panel lets you apply entrance animations to your wrapper or item. You can customize how and when the animation starts:
- Animation Effect: Choose the type of animation (e.g., fade, slide, zoom).
- Duration (ms): Set how long the animation takes to complete (in milliseconds).
- Delay (ms): Set a delay before the animation starts.
-
Trigger Location: Use a value between 0 and 1:
- 0: Animation starts when the element hits the top of the screen.
- 1: Animation starts when the element reaches the bottom.
- Loop Animation: Toggle on to keep the animation repeating continuously.
- Repeat on Reveal: toggle controls the playback frequency of your entrance animations. - When enabled: the animation triggers each time the element scrolls into view from below, so the effect replays whenever a user scrolls back down past it. - When disabled: the animation will only execute once upon the initial page load.